More card making with my own girls this weekend as well as starting on decorations for our house. We are all looking forward to it!


<a href="http://www.bloglovin.com/blog/3499573/?claim=h3642aqa7vn">Follow my blog with Bloglovin</a>

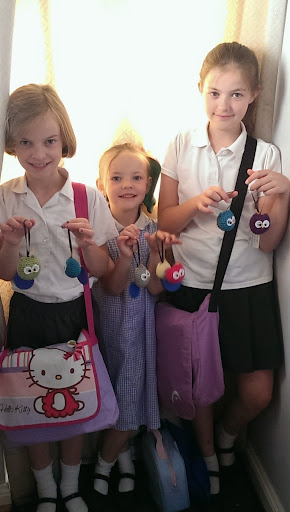
End of term, I don't usually give gifts to the teachers. But the girls wanted me to make something little. I'd seen these owls on ravelry, and rattled a few out! As you do!
It took me about a week to complete them. Not happy with the glue soaking into the (button) eyes, when it was meant to be a dry clear, but I guess the felt properties affected it.
Still, they were welcomed abd have a few left over to give to my lovely friends too... Twit twoo.. sorry couldn't help myself! Lol
Last month at Craftability I introduced watercolour to the ladies scrapbook pages.
Excuse the lack of posts lately, the blogger app on my phone had been playing up, but I've now found another one!
cos that's what I have to do!
Some people can't seem to flip a sketch or layout around.. or think that if you don't have exactly the same kind of photo regarding colours. Oh and there we go, back to that old term of inspiration & interpretation. (Emma... Stop!) I'm so glad no one reads my rants!
Any way, a bonus layout from class yesterday. Using Bo Bunny papers. A very bright layout for me, but I liked it all the same.
The 'LOVE' one was the page that I offered the class. I spritzed the page first with a mica powder mist I made with water. Placed the yellow strip, then using 2 of the cut out pieces from the patterned paper (it had about 8 to choose from) layered them up with the photo. Btw, some inspired people used 2 photos.
Adding a diddy doily for some texture.
Once everyone had used the basis for their layouts, I added my own personal embellishments - because we are all unique in how we embellish - with sewn on buttons and the cut outs from Dee's well borrowed stampin up chevron border punch. I felt using that tied in the title to the photo.
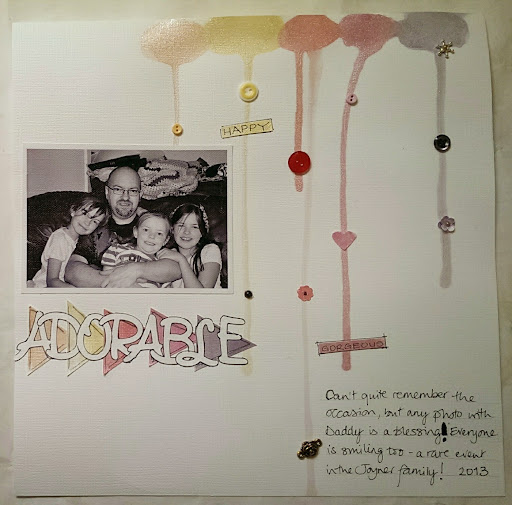
On the second layout, this was to celebrate Sarah's 18TH birthday ! We had a lovely family day together.
I didn't want to use all of the cut out pieces that I gave myself, so cut down elements of them and layered them up to please my eye. Loved doing this! Especially using the die cut and it's little square remains to embellish. Oh, I added brands too.
Any way, some of my recent designs documented.


I put together a layout for todays class... Wasnt sure how to take the reactions, but when I showed a few people an idea of what we were doing, they didn't seem overly impressed, however, when they saw the layout in person, one said, ...' that picture didn't it justice!' - well why not just tell me straight out you didn't think much of it in the first place! Pah! Some people..
Well, I liked what I did to begin with. Once in the class I added embellishments so that everyone could use the same items... So we covered heat embossing, a lovely effect which matched up with the gold stripe in the patterned paper. Using torn papers, layered up and then finally spritzing, which once again not to everyone's tastes, but most did attempt.
The end result a monochrome gold layered page. I took inspiration from a journal page I saw on the paperartsy blog this week, I loved the direction and build up of the papers, textures & stamping on the layout.
It is really nice to take inspiration and throw my own twist onto it! That's what being inspired is all about after all, not copying exactly!? Am I wrong?
More pages tomorrow if the other layouts I completed today at the crop at Craftability.

I have to say out of all the tags I made on Saturday at the crop I go to. (i know no scrapbooking on National Scrapbooking Day!)
It originated from a plain white cardstock tag and is totally one layer.
This stamp set was a bargain find at Ally Pally that Karen found, it is a Tim Holtz, Stampers Anonymous set called Natures Walk... I'm in love with it! And at this time love that I have a fabulous buddy that I know will let me borrow it too!
My favourite type of stamps hands down are etched style ones and these are a perfect example. No needed to colour in and simply my own artistic flair, composition and placement. All of the artwork had already been done... Did I say that I love stamping!? Lol...

Another piece of inspiration from the 3up bloggers on paperartsy. This time coming from Kirsten Sheridan.
On Friday Kirsten created a textured, layered, abstract composition on greyboard.
I started again with a white card tag using 3 different blue acrylics layered up the different hues and added a strip of dictionary paper (can you tell I love this ephemera!).
Adding some dylusions border stamps one the paint was dry and a chicken wire stamp with potting shed archival ink (love Wendy vecchi's new colours)
The blocks were formed from a cardboard box, I like the undulating curves that were formed when I painted them with the acrylics. On each block I added a different stamped element, a number collage, phrase and then the same chicken wiring from the background.
Lastly I added a step of stamped numbers and then on top of that a cluster of paper flowers from my stash accompanied with 2 pearl pins.
My lovely friend Nancy gives me her unwanted butterflies from her monthly kits (my gain!) This time they were cork, lovely thick cork! What a perfect finishing touch to my tag.
Abe that's my inspiration done! Well kind of! I created another tag, but I shall share that tomorrow, not only that, but since reorganizing my craft room, I have a need to go and create more now.. so be prepared for some non stop crafting from my little craft shed!
Watch this space!....


Another installment of my inspired work from the 3up artists on the paperartsy blog.
On Friday I loved the art that Ruth Mescall entered on the blog. It was a multi coloured masterpiece!
I started out with a white cardstock tag. Gesso'd through my new stencil to add texture to the base, waited for it dry and collected some stamps (thank you Karen, mwah x)
For the flowers I used a paperartsy mini set inked onto dictionary paper and then messy cut out - including the teeny tiny dots!
Once the background was dried I started shooting acrylic paints in big bold colours. Again I applied with some cut and dry as I found that it got into the details of the stenciled relief.
Once I was happy with the effect, I inked in memento black the PA flower stamps as well as the postcard from PA Words - plate 4.
I wanted to add the white effect as well, but I didn't have a suitable white paint so spritzed a white spray paint onto the jaquard stamp (from PA Letters - plate 5) it kind of worked... Left a white sludge, but I'm happy with the hap-hazard effect.
I attached the flowers, dots and added the phrase (man of numbers - plate 5) and then added some black brads as a last minute thought ( I trimmed the legs of the brad and adhered with lots of cosmic shimmer glue!
I love the overall effect, it reminds me of the Joseph's dream coat technique before you add a layer of dark ink! Ooh... The creative flows once again!
Enjoy!


It's 3up week on the paperartsy blog this week. There was so much artwork and creativity going on, it was hard not to pick up a paint pot and splodge away! I loved the work that Lesley Ebdon created on a framed mirror and took my inspiration from her work.
At my recent trip to Alexandra Palace, I bought a tray from the mdf man that I am going to use for my craft tools.
This was the perfect substrate to get my art on! I had fun building up the layers..
I started with a base layer of a light blue then mixed 2 further shades of blue using a cut and dry pad.
Using a Dyan Reaveley border stamp inked up with watering can archival ink I went on the inside edge of the tray, whilst that was drying I stamped some JOFY glitter and circle images into some old dictionary paper.
More JOFY stamps were used for the flowers and for effects. Once everything was dry (ish! - You know us crafters are impatient!) I added acrylic paint to accent & glued the dictionary images with gel medium.
Fab inspiration from paperartsy! Ta muchly!


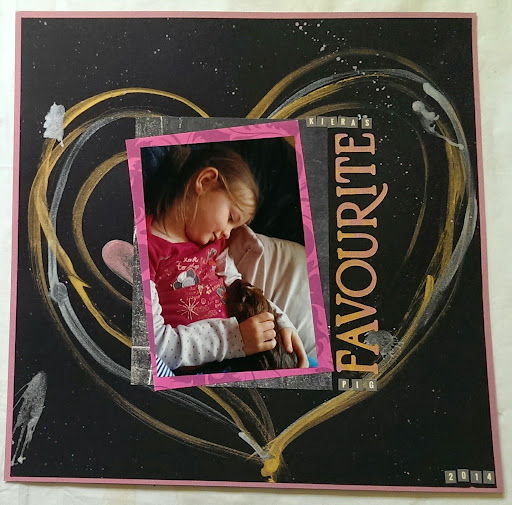
There are not many times that I would solely use stamps on a layout for scrapbooking. But my friend Karen showed me an example on the Paperartsy blog using JOFY stamps, but also laying it out in a project life styley!
So at our crop we go to, we set ourselves a mission to finish a layout!
It was great fun getting messy and laying out each rectangle to make a larger picture.
I finished off by stamping the title and the journaling too.
Looking forward to our next challenge Karen!

So, a bad day for me means waiting for meds to kick in, blocking out the pain and normally watching YouTube!
Christy Tomlinson has always interested me, so finding out that we have lots in common surprised me! I watched a couple of her videos and one was her she art taster video.. and the impatient person that I am... Took some notes and once I collected the girls from school I grabbed some paints from my newly organised craft cupboards and splodged away!
I am pleased with what I ended up with. I used acrylic paints, inktense pencils, charcoal pencil and a black pen for outlining.
For next time I am going to add more texture on the background and make sure that the doll is more in proportion to the page.
Not bad for a first attempt and no template!

Another session at Craftability in Ipswich. I used one sheet of patterned cardstock along with 3 coloured bazill c/s.
Trying to emulate the popular project life trend that is going on atm, I decided to trim 3 blocks of colour to mount on top of the cinder background. The blocks are 10x15cm. With photos mated on top of these, I took the flowers from the patterned paper and messy cut them, inked the edges and arranged them in a central cluster to join the three blocks together.
I experimented this month with making my own version of enamel dots, I did this using pearl paint, after several attempts I found out that using simple plastic packaging (this time from my die packages) worked a treat! We just popped these off when needed and then were glued into place with a tiny dot of cosmic shimmer dries clear glue.
The banners and words were cut from the reverse of the page.
The bottom right hand journaling box was stamped repeatedly with a flower stamp and then added with white strips of journaling.
We also experimented making our own backgrounds that I will show in the week!

So with it being Easter weekend, it was family time, so whilst some of the girls opted for another rendition of Disney's 'Frozen', the more sensible of us opted for a sulk around the dining table! So in order to try and cheer sad daughter, I suggested some decopatch...
We still had some finishing off to do on the kits the girls received at Christmas, so more 'foxy' business commenced!
I remembered that my beautiful caring Sarah had bought me a kit from Craftability after a bad day at work (to cheer me up!) Can you tell what it's meant to be? I've first of all covered it what I call 'galaxy chocolate' tissue paper and then once it is dry I will decide how to finish it off...
What do you think of our handy work?


For those none the wiser, I'm talking about Alexander Palace Big Stamp & Scrapbooking Show (BSSS) . An annual road trip for us crafting gals.
After a week of not having good health, plus entertaining the girls during their first week of the Easter holidays, it was a well deserved day out!
Many pennies spent, lots of stamps bought, cardstock, mdf blanks and a few dies later, 3pm came for our show and tell sit down.
I'll be showcasing some off my purchases during the next few weeks as I am determined to use these items instead of them sitting around in my craft room! Lol. I'm even considering to do a haul video highlighting some of my favourite shops and the bargains that they offered during the shHiow.
I was totally amazed of our British designers and suppliers of whom I'm determined to be supporting from now on. There has been too many years where us crafters have coveted US items and waited patiently (or sometimes not so patiently) for them to arrive in the UK. It is very exciting times for us all in the UK!
Any hows, crafty item today is the thank you card that I gave my friend Janina for driving us there and back. And a bonus photo of a very tired Emma & Karen after a long day of traipsing around all the stalls... Looking forward to next year already!


NEW TOY ALERT!
It was Karen's birthday so we decided to treat ourselves to something each! Well I thought that it was a good enough excuse!
Stampendous have brought the creative pallette a see through A4 clear sheet that you can apply mediums to and pull off 'prints' A bit like the Gelli plate, but cheaper! Lol always one for a bargain.
We originally played with Karen's paperartsy fresco paints, but they didn't seem to be successful even with an extender, but when I got home I had a play with some acrylics that I had to hand, namely, my Adirondack paint daubers pictured below.
I had fun with the girls with a few prints and now that I've played more am looking forward to i) making something with these sheets & ii) making more! Lol
Enjoy x


Well another month has passed and another chance to share my talents with the girls at Craftability.
In the shop there were some new Authentique papers in a mix of ble and yellow, I really wanted to use them so put this layout together.
We used spritzers to add colour to the base white in the top right and bottom left hand colour. I was quite impressed in how they jumped into the challenge.
I added several diecuts for added interest using my own memory box and sizzix dies as well as some eksuccess flower punches.
The main patterned pieces were placed as matts behind our photos.
The title was split between stamped, hand written and a diecut on the cricut.
Enjoy!

.... even if I do say so myself!
My friend Rachel is due with her second baby girl today. I am sending her positive labour vibes and hopefully her bundle of joy will arrive very soon so the family can meet her! Not only that, but Rachel is having to inject herself every day and will do for 6 weeks post birth due to a rare blood condition that Rachel has. I know that this bundle of joy had been extremely longed for!
Anyway, I've been busy making some hats for her (oh I look forward to knowing her name!) Both made from cotton yarn. One is a cool summer hat and the other a diddy bonnet with a flower accessory.


So, I managed to finish the shawl off, I cant show it, I must resist showing the whole thing as it is what is called a CAL (crochet a long) and this one is done in the stages, basically the pattern is given in the stages ! Don't want to give the game away do I! I can show instead a daily I made last Monday whilst Molly was off poorly.. I saw a pin on Pinterest which was a Russian pattern in the form of a diagram, so I bit the bullet and attempted it! All in all it took my @ around 2 hours, I might be making some diddy coasters similar!
So, yesterday it was gorgeous! The girls were out playing, I bought some plants last week, Rob planted them for me and started tidying up the garden. SPRING HAS SPRUNG! I'm excited!


So, Thursday night, browsing ye old Facebook, Rohn Strong (US crochet designer) was asking for people to help him out. Having finished my blanket, completed a doily and Sarah's hard drive case, I thought why not.
So Friday morning I received an email with top secret instructions of three clues. I'm almost finished clue 2 now. Haven't got a clue if what I'm doing is ok., but hey ho... Has kept me out of mischief I guess. We can't show the completed project until March 18th, but I can keep you in suspense can't i?! Lol... Call me mean.
So with my back giving me problems again, I've been layed up - crocheting lasting down isn't much fun (read pins & needles!) But I've succeeded in short spurts.
YOU LIKEY?

Julie Fei Fan Balzar is renowned in the stencilling world for some beautiful designs, most I know of are endorsed through Crafters Workshop. I love her whimsical designs, versatility and patterns that they create.
I also love how she doesn't just use her stencils, templates or masks solely for mixed media like other artists, but encourages others to use their newly created backgrounds to be used with cards and scrapbook pages alike. A GIRL AFTER MY OWN HEART! Those who have taken my classes know that this is a huge passion of mine!
Anyway, to my delight, I found out that Julie does live broadcasts demonstrating her techniques... I got totally lost watching a few, but had to stop as my head was starting to explode with envisaging how I could use the stencils that I own.. needless to say the creative juices began to flow!
Here's the link to Balzer Designs blog entry that I watched. The video link is at the bottom of the entry..
Why give something up for lent?
They say that it takes 40 days to break a habit... So, me being me, I'm going to flip this saying and start my new habit.
I've been off the radar for a long time, both crafty & life in general. Don't ask why, it's just how I cope.
I don't care if this is not going to be huge, but rather a virtual diary for myself. My day to day craftiness, creativity & general chatting.
YOUTUBE
Since being bed bound for far too long, I've developed a fascination with YouTube... Just love it! I want to log what I have been watching, learning and what had inspired me each day.
I'm hoping that documenting my daily 'doings' will also act as a memory board for me and inspire me to make something dare I say... Each day?! Well if not irl, in my mind.... Lol!
So, without further ado, what I perused this a.m.
Stencils!


